By Jett Peters
Correctly framing an image before you begin a project is an essential component of the planning process. Once you begin taking data, shifting framing means either living with a substantially smaller field of view, or discarding the data you have up to that point. Thankfully, some new surveys in combination with Aladin and Stellarium have rendered the process of framing significantly more effective.
Aladin is a sky atlas tool that goes far beyond other options. Its merit is more on the astronomy research side than the amateur astrophotographer side, but some of its unique features are applicable to astrophotography projects. Aladin comes in two versions: the lite web-based version, and the desktop full-featured version. While what we aim to accomplish is possible within the full version of Aladin, using the web version in combination with Stellarium simplifies the process significantly.
Link to tool: AladinLite
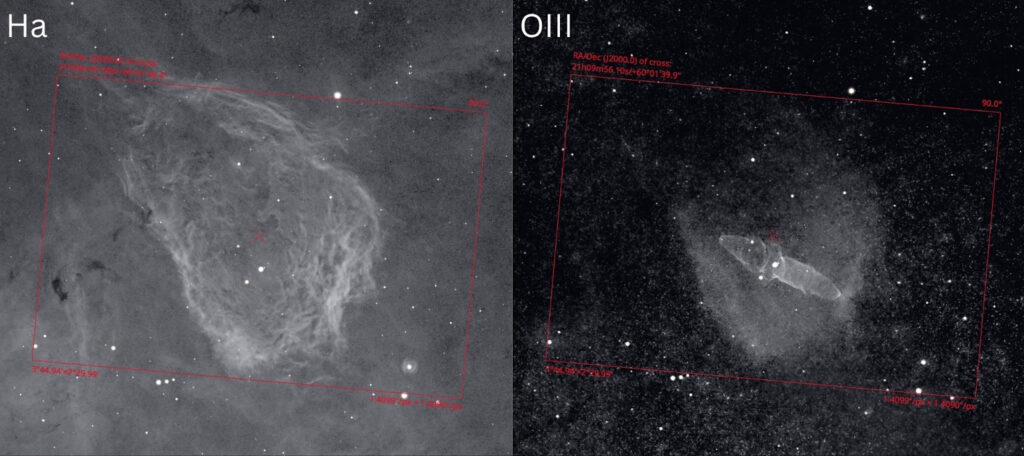
The benefits of Aladin Lite are multifaceted. If you are looking for inspiration and just want to explore the sky, there is no need to open a heavy piece of software. Aladin Lite runs smoothly within your web browser, and you can quickly and easily hone in on a given object and understand its bands of emission. When framing an image, most tools default to a survey like DSS2. While this is a good survey, you cannot get a good feel for a target if it is faint in broad band but strong in narrow band. For a target such as WR134 for example (type WR134 into the Aladin Lite search box and see the result) there is very little signal in DSS2, and this makes it hard to get a sense for the target. Aladin Lite, however, makes it very simple to change the survey, and this makes it possible to view a target in the bands where it emits the most light. Looking at WR134 in an OIII survey is a night and day difference compared to DSS2.
But before we talk about accessing other surveys, let’s get to know the interface of the lite version. The search box at the top is very versatile. You can enter coordinates, common names, or catalog names. Coordinates from anywhere in the sky can be easily copied by clicking the copy button next to the RA and Dec. If the text is pink, that corresponds to the center position of the crosshair.
On the right is a catalogs section which lets you select between SIMBAD, Gaia DR3, and 2MASS. SIMBAD is the most useful of these three to astrophotographers, and toggling it on in Aladin Lite essentially plots each SIMBAD entry at its coordinates in the sky. This makes it possible to easily research an object or region and see how different objects are oriented relative to each other. Ever wondered what that tiny galaxy is next to your main object of interest? Now you can find it in the survey and click its SIMBAD link to view more information than you probably wanted to know.
The left side of the Aladin Lite interface shows a few surveys that you can play around with, but to get the best surveys we have to go a bit deeper. Follow a few simple steps within Aladin Lite and you have access to the best narrowband surveys currently publicly available, NSNS. Northern Sky Narrowband Survey or NSNS is a sky survey in Ha, SII, and OIII created by amateur astronomer Stefan Ziegenbalg. This survey is incredibly impressive, and with a few clicks you can view any target in the northern sky in deep narrowband.
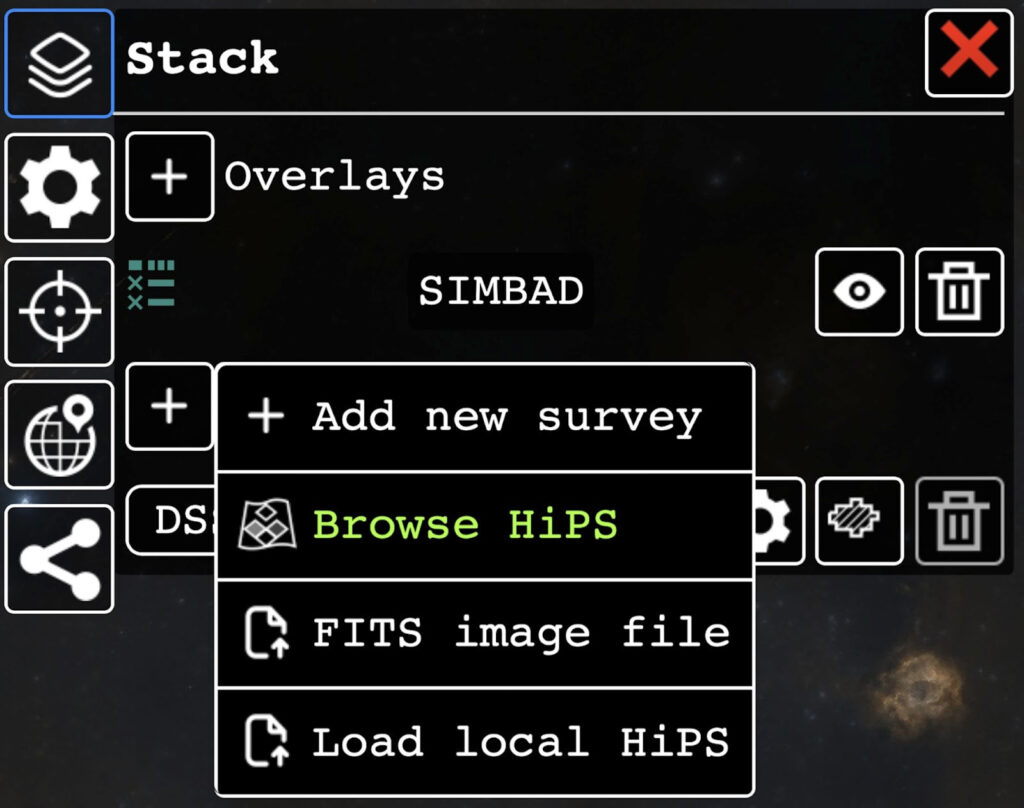
First, click the overlays menu button, then the plus with surveys next to it. This will bring up a few options, one of which is to browse HiPS. If you click this option and type NSNS, you will see all of the NSNS surveys.
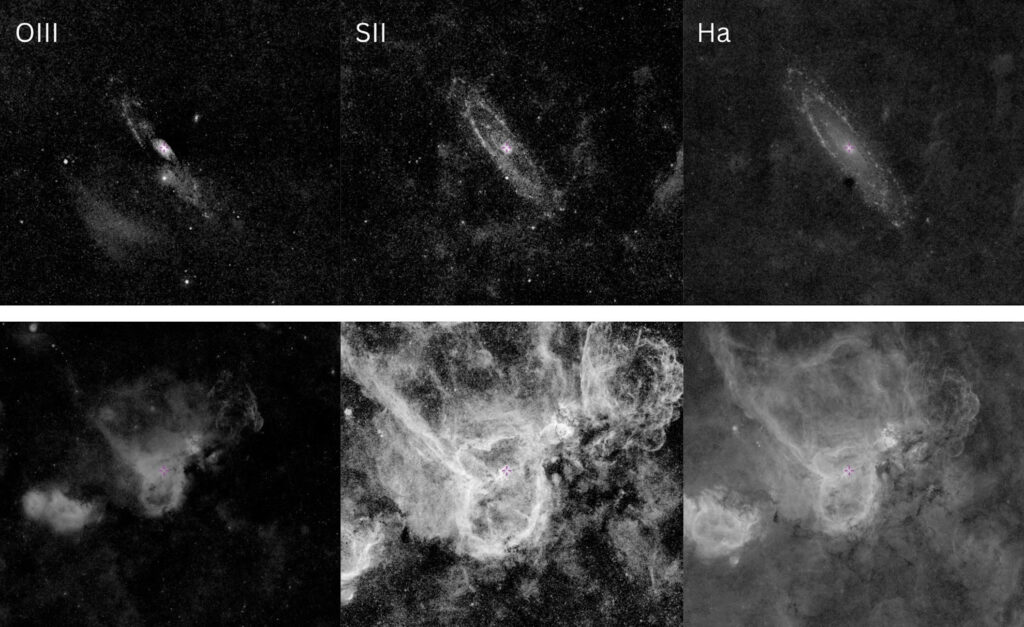
For most applications, if you don’t want to adjust the stretch, the 8-bit versions of the surveys will suffice. The Ha survey is named NSNS DR0.2 H-alpha (8 bit), the SII, NSNS DR0.2 [SII] (8 bit), and the OIII, NSNS DR0.2 [OIII] (8 bit). Clicking the little information symbol next to the survey will open it in a new tab, or it can be added as another layer in the standard Aladin Lite window. The Ha, as you would expect, is the cleanest of these surveys, but the others have great utility in understanding if a given region is strong in different channels. The following figure shows M31 and the Heart nebula in each of the 3 NSNS 8-bit surveys. Notice that even the amateur-discovered oxygen arc shows up in the OIII Andromeda image. These surveys are deep!
Let’s now get back to framing. So far we have seen how to use Aladin Lite as a reference, but what if you wanted to frame up a target using the NSNS surveys? This is where we switch to the tried and true Stellarium. The default view of the desktop version of Stellarium is slightly underwhelming, but Stellarium does make it very easy to enter the FOV of your system. To switch from the stock Stellarium view to a different survey, first click F2 or head to the configuration window and make sure the HiPS Surveys box is selected. Now hit F4 or go to the sky and viewing options window, then navigate to the surveys tab. Make sure “Deep Sky” is selected at the top, and then search for NSNS. Checking any of the NSNS surveys will select it, and then all you have to do is go to the main bottom menu and click the HiPS button. This will place the NSNS survey you selected on top of the standard Stellarium view. Now you can frame up a target with the best narrowband surveys as you would normally in Stellarium.