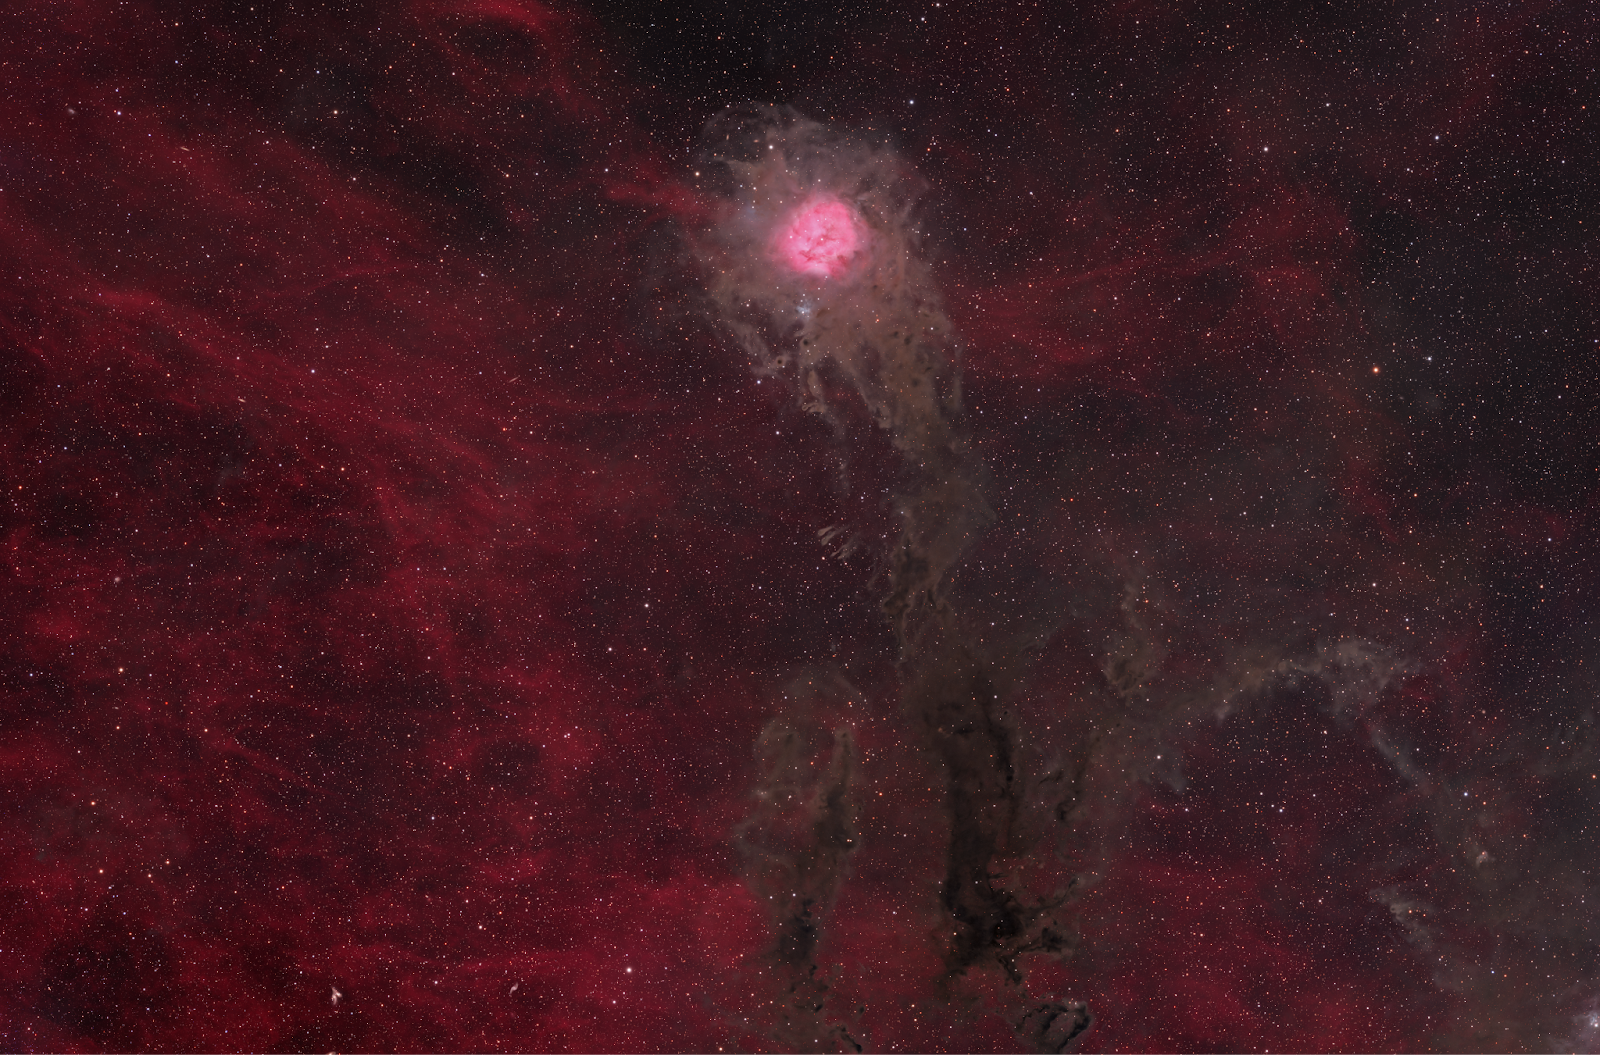
Below I present my new and improved Cocoon image. After a significant amount of time spent processing in PixInsight, and some discussions with individuals who know far more than me, the image now has more depth and detail while still retaining its vibrant color. The main improvements come in the Ha color and intensity, along with star processing. There is always room for improvement, but I am happy with how the image has progressed.
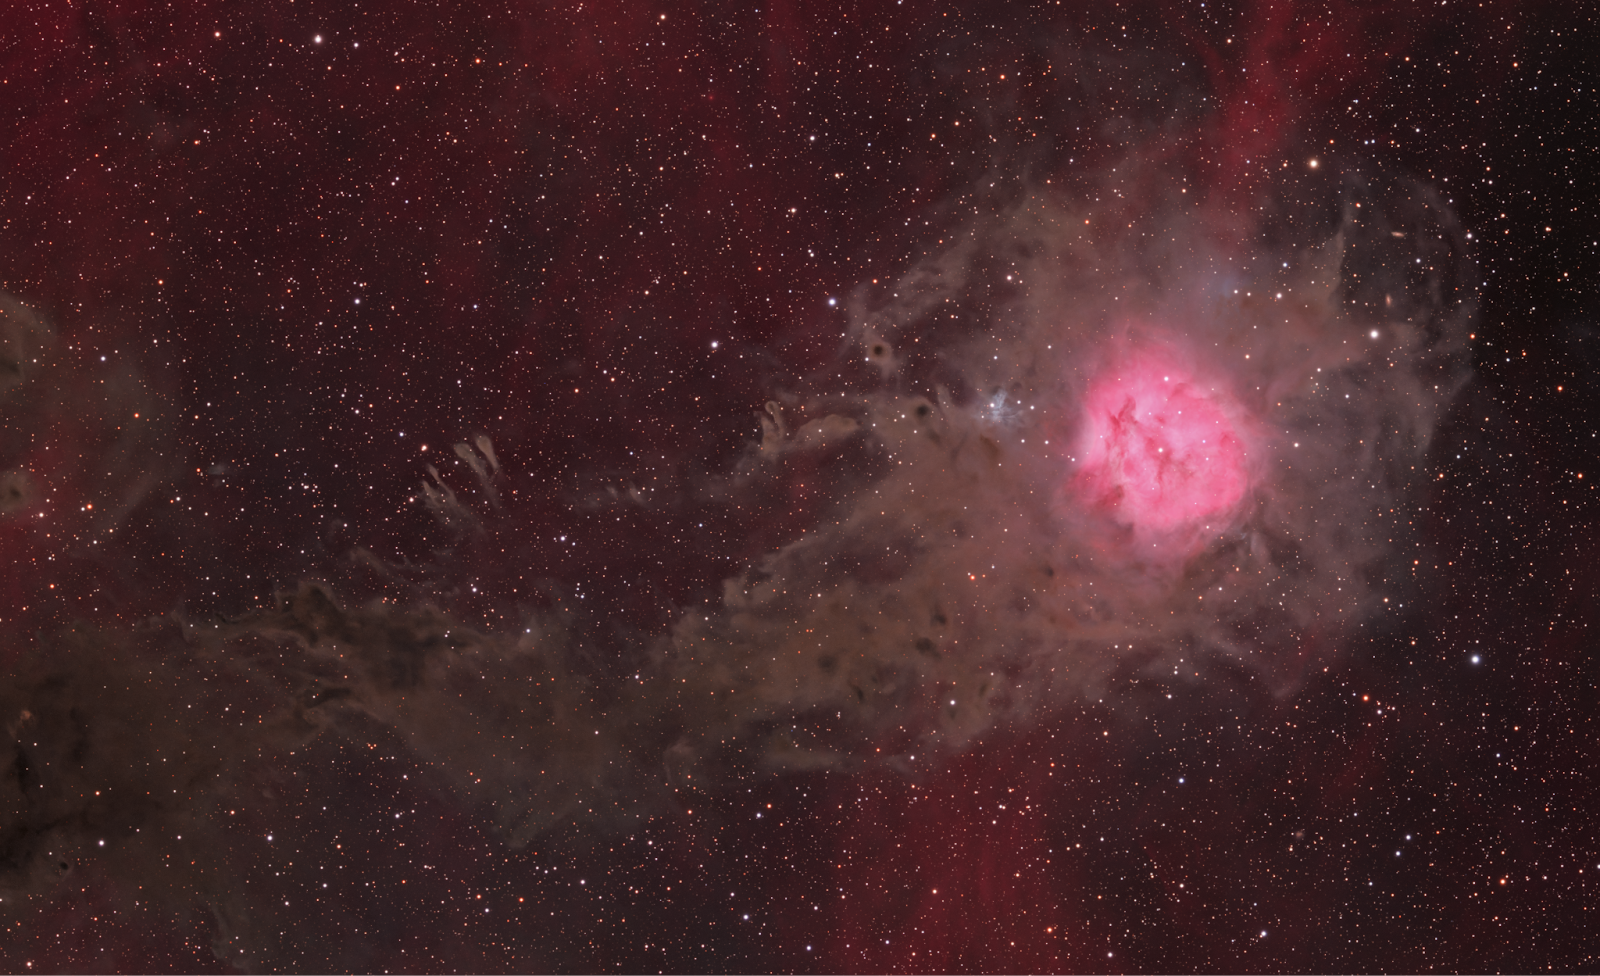
A close up of the core is shown below:
While I will not give a comprehensive description of every step used in processing this image, below is a flow chart detailing an overview of the process, and an explanation of some of its elements. One of the major difficulties faced by beginners learning to process in PixInsight is that there is no single path to take, and techniques that work on one image often will not work on another. In essence, PixInsight processing is not formulaic, and requires careful understanding and usage of processes. Stretching and curves, for example, seem trivial on the surface, but there are certain techniques and methods of manipulation that preserve the detail of the image while coaxing out more signal. To a significant extent, processing is more art than science, and this is the part that is difficult to learn. In the outline given here, I wish to take some of the mystery out of the process and create a roadmap for someone with a basic understanding of PixInsight to achieve a more satisfying result. This method is designed to work for composite dust and emission regions where there are significant broadband and hydrogen components.
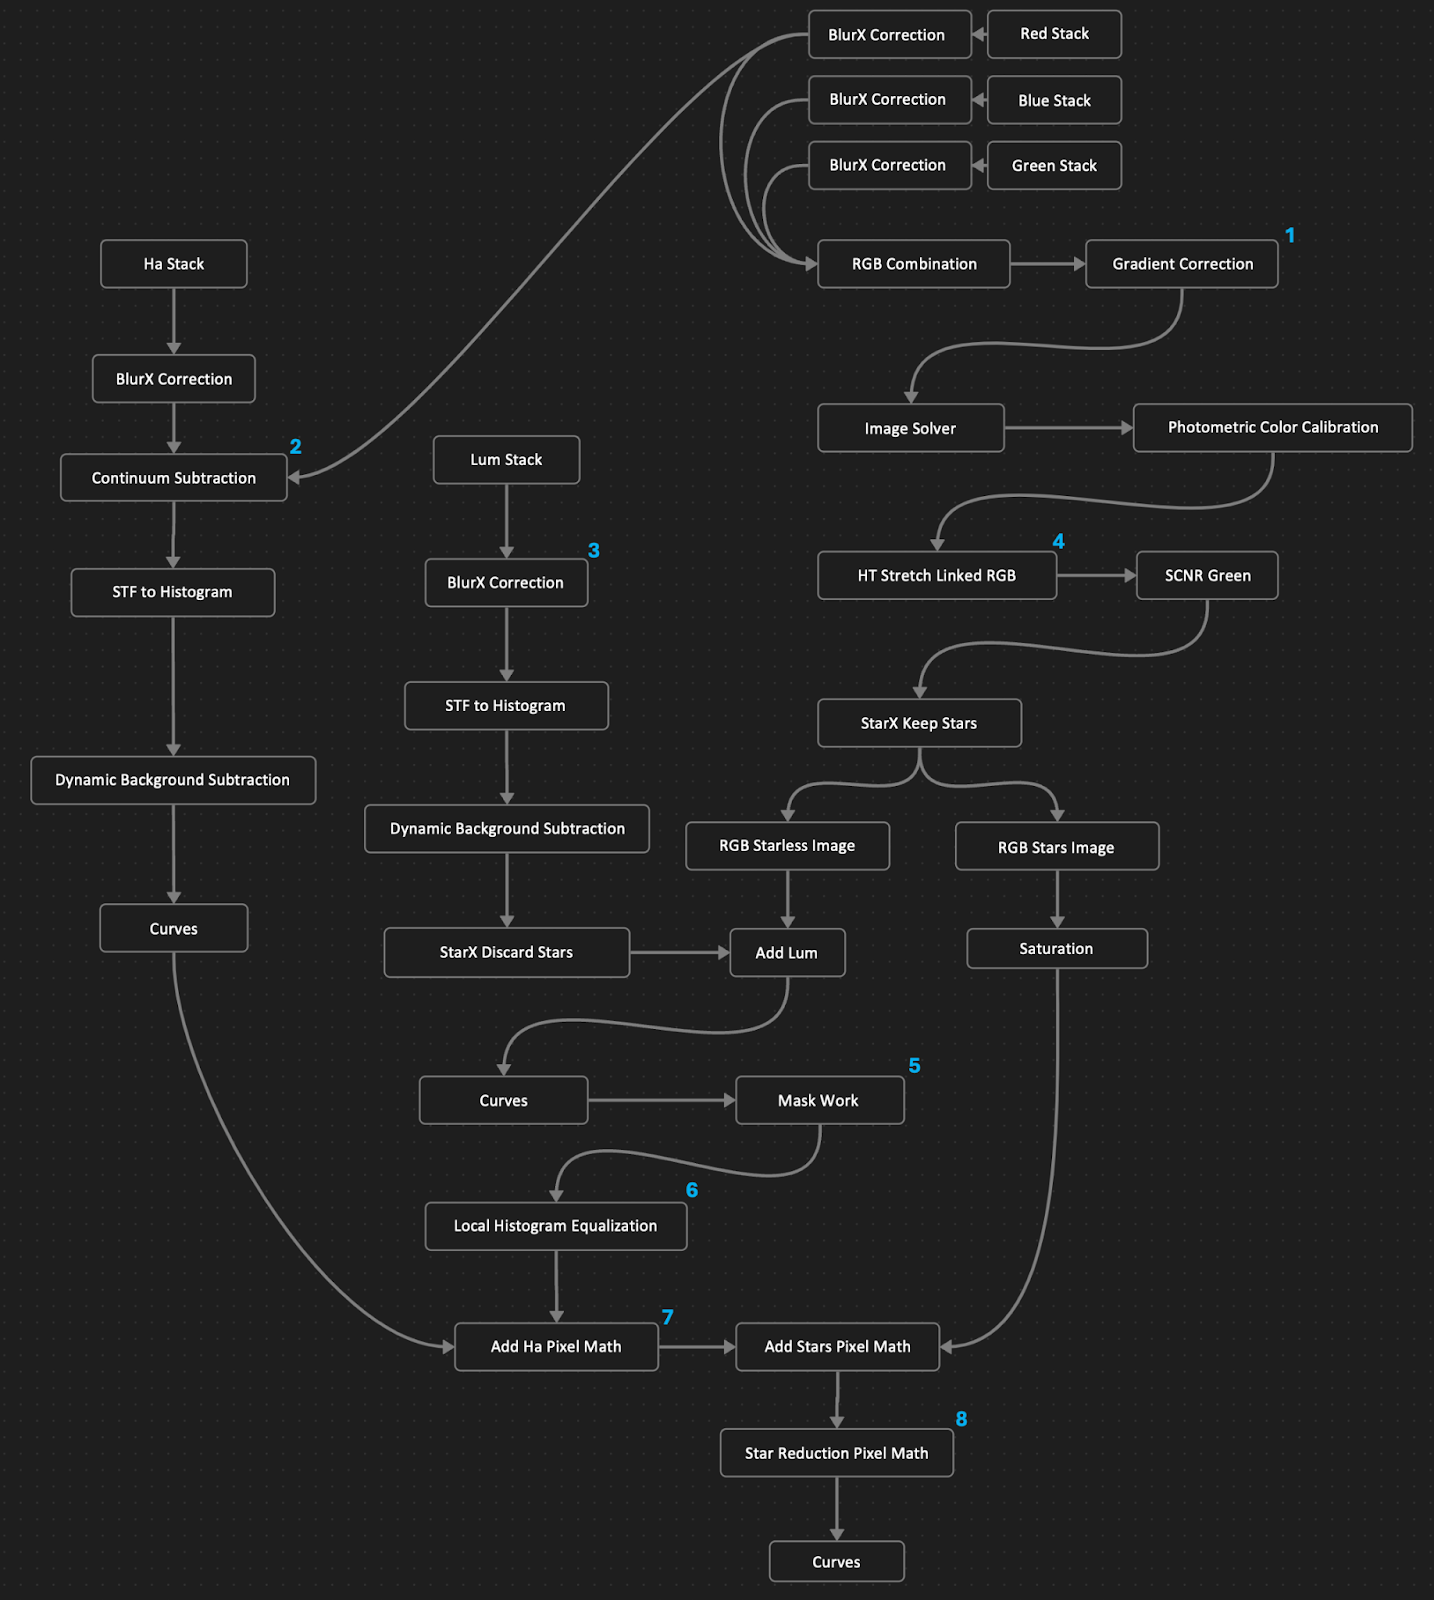
1. The Gradient Correction tool in PixInsight is not the typical approach for high-level workflows, because if Dynamic Background Extraction (DBE) is mastered you receive much more control over the process of correction. However, when it comes to RGB images with lots of dust detail, smaller color gradients can appear throughout the image as a result of poor point placement. I have found that when using Gradient Correction for the RGB composition, these small gradients do not appear as frequently. However, on the topic of gradient removal, DBE is a better tool to remove any gradients from the luminance stack, which is grayscale. Gradient Correction seems to remove contrast or depth from the image. This is okay for the RGB since we just use it for color, but for the luminance we need this depth, so DBE is the better choice.
2. Continuum subtraction is a very powerful tool in advanced LRGB + narrowband processing. It allows for the removal of the broadband emission that may be present in your narrowband stacks. For the Cocoon nebula, it is not strictly necessary as the core and background are true Ha emission, but for other regions, it can majorly boost image quality. To perform continuum subtraction, I recommend using the Photometric Continuum Subtraction script by Charles Hagen.
3. I have added an explanation of BlurX here as well. While it is a well-known tool, I use it differently on the RGB stacks and the luminance stack. For the RGB stacks, I use the “correction only” mode, as this preserves the star quality while improving corner stars or any artifacts. For the luminance image, I use BXT in a much more extreme mode, as I wish to actually sharpen the detail of the nebula itself. This is an image by image decision, as some regions can take more sharpening than others, but by running BXT separately on the RGB and luminance, you can push the sharpness of the region further while preserving natural stars.
4. The HT Stretch Linked RGB is a pixel math script developed by Bill Blanshan that, while not as flexible as other stretching options, provides a great starting point for dust regions like the Cocoon. The script does not push data too far, and gives dust a nice brown color, which looks good out of the gate. This is one of those tools that will let you get 90% of the way there with minimal effort. You will need to use color calibration before using the script, so keep that in mind.
5. Mask work is an essential part of processing regions like the Cocoon, as the core (which is extremely bright) is easily blown out. Using masks in PixInsight is surprisingly easy, as while you can use a tool like Range Selection to isolate an area of a given brightness, it is easier to just click the Extract CIE L* component button on the toolbar and curve the image until the correct component is isolated. Everything should be clipped except for the part of the nebula you want to isolate. It is also good practice to use “Multiscale Median Transform” to soften the mask.
6. Local Histogram Equalization is a potent tool that can significantly increase nebulosity signals but can also make an image look very artificial. It is best employed on targets like the Cocoon where separation between the dust and background is crucial. Essentially the tool selectively brightens certain regions of the image, elevating them above the background. It is very important to not overdo this tool, and even a small amount has the risk of looking artificial. Yet again this is a tool that should be used on an image by image basis.
7. Hydrogen addition to LRGB images introduces another dimension to a composition, but it also represents a significant challenge. When I was starting out, I utilized the CombineRGBAndNarrowband script part of the Toolbox scripts, and I wrote a blog on this tool last year. While this tool is extremely easy to use, it lacks a lot of flexibility and the color of the hydrogen is at times problematic. The original Cocoon image I produced used this method, but this new version uses a few pixel math operations to add the Ha. The pixel math operations are contained within the icon set I have attached at the end of this blog. The difficulty in this method is prepping the Ha correctly for combination. To give you an idea of how this should be done, here is an example of the auto stretched Ha for the Cocoon against the correctly prepped version. In addition, it’s important to understand you can apply these pixel math scripts multiple times and they each have different intensities and color balances.

8. Star reduction in a region like the Cocoon is very important. As I stressed in my previous blog, the amount of stars in the area obscure the nebula. One of the best methods of star reduction is to yet again use pixel math developed by Bill Blanshan. The version 3 method of this famous pixel math is contained within the attached icon set, and they do a great job of preserving star shape while reducing size.